How to Setup Ingress on Minikube Kubernetes with example
If you are learning Kubernetes then you might had heard of Ingress object which is used to allow external network access to the Kubernetes cluster. For doing a hands on, Minikube is one of the widely used software which setups Kubernetes environment. In this article, I am going to show you how to enable Ingress in Minikube and a example on how to use it.
Before You Begin
If you are new to Minikube and haven't installed it yet, then refer to the below article for the installation steps.
- Install Kubernetes using Minikube on Linux, CentOS, Fedora, Red Hat
You should have a working Minikube setup and dashboard. The kubectl tool must be installed and working in tandem with Minikube.
Start Minikube
minkube start
Enable Ingress Controller
- Run the following command to enable the NGINX Ingress controller:
minikube addons enable ingress
- Verify whether Ingress controller is running or not:
kubectl get pods -n kube-system
Use Kubernetes Dashboard as application
Since Ingress controller is enabled and ready for use, lets deploy Ingress service for Minikube Kubernetes dashboard.
- Get the Kubernetes dashboard details which is present in kubernetes-dashboard namespace by running following command:
kubectl get all -n kubernetes-dashboard
Output:
NAME                                             READY   STATUS    RESTARTS   AGE
pod/dashboard-metrics-scraper-7976b667d4-f6q74   1/1     Running   6          23d
pod/kubernetes-dashboard-6fcdf4f6d-ghq97         1/1     Running   12         23d

NAME                                TYPE        CLUSTER-IP       EXTERNAL-IP   PORT(S)    AGE
service/dashboard-metrics-scraper   ClusterIP   10.100.4.35      <none>        8000/TCP   23d
service/kubernetes-dashboard        ClusterIP   10.110.150.181   <none>        80/TCP     23d

NAME                                        READY   UP-TO-DATE   AVAILABLE   AGE
deployment.apps/dashboard-metrics-scraper   1/1     1            1           23d
deployment.apps/kubernetes-dashboard        1/1     1            1           23d

NAME                                                   DESIRED   CURRENT   READY   AGE
replicaset.apps/dashboard-metrics-scraper-7976b667d4   1         1         1       23d
replicaset.apps/kubernetes-dashboard-6fcdf4f6d         1         1         1       23d
- Note down the Kubernetes dashboard service name and port (highlighted in above output) which will be used to create ingress resource.
Create Ingress Resource and Validate
- Let's create a ingress resource using dashboard-ingress.yaml file with below contents:
apiVersion: networking.k8s.io/v1
kind: Ingress
metadata:
  name: dashboard-ingress
  namespace: kubernetes-dashboard
spec:
    rules:
      - host: kub-dashboard.com
        http:
          paths:
          - path: /
            pathType: Prefix
            backend:
              service:
                name: kubernetes-dashboard
                port:
                  number: 80
- In the above file, apiVersion and kind denotes ingress resource.
- The name of the resource will be dashboard-ingress which will be created under kubernetes-dashboard namespace. Note that we are not using default namespace here because kubernetes-dashboard is present in kubernetes-dashboard namespace.
- Under specification we define host name as kub-dashboard.com as an example here. You can use any domain here as we will be creating host file entry later. Under http, provide path to which dashboard opens, service name to use and port number on which service is exposed. If you recollect, this information is already gathered in previous step.
- Let's create ingress resource using the above file now by running following command:
kubectl apply -f dashboard-ingress.yaml
Output:
ingress.networking.k8s.io/dashboard-ingress created
- Get the ingress resource details like IP and port by running following command:
kubectl get ingress -n kubernetes-dashboard
Output:
NAME                CLASS    HOSTS               ADDRESS          PORTS   AGE
dashboard-ingress   <none>   kub-dashboard.com   192.168.99.100   80      3m53s
- We have specified domain name kub-dashboard.com in ingress resource file. Let's create a local host file entry on system and point it to the IP 192.168.99.100 which is assigned by ingress service as in above output.
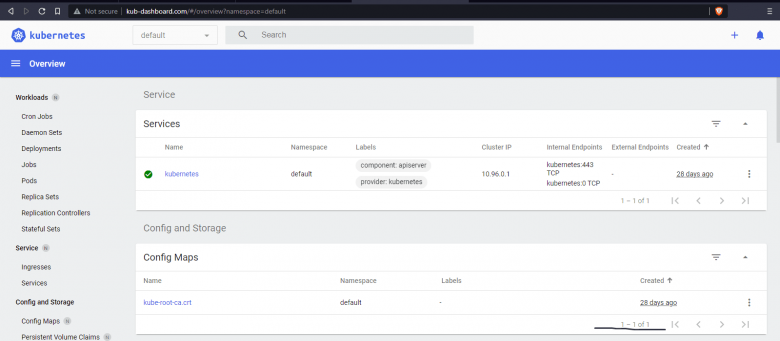
- After adding the entry, browse the domain kub-dashboard.com and you should see the kubernetes dashboard displayed as in following image:
Do you have any additional comments, questions, or concerns you would like to share? Please post in comments section.


